

Windows Group Policy and Corporate Installation of the DisplayLink Software for Targus UDS

This article is to provide an overview for those building corporate images and/or deploying the DisplayLink software for Windows using either the MSI or INF files. Side-by-side driver updates are supported by all three driver types.
It is recommended that a system compatibility check is run on the PC system before deploying the DisplayLink software.
MSI Deployment Pros and Cons
Pros of an MSI driver deployment
- Allows deployment to PCs where users do not have Administrator privileges
- Allows remote management of software install, upgrade and uninstall
Cons of an MSI driver deployment
- Could be deployed to PCs that are not connected to DisplayLink devices. However, DisplayLink software will run in “minimal system impact” until a DisplayLink device is connected.
- MSI installations cannot be upgraded using Windows Update, which updates your driver via the Windows Driver Store. Therefore, you cannot use an INF or EXE deployment from the Driver Store to upgrade DisplayLink software installation previously deployed using MSI files.
Pros of deploying the driver package to the windows driver store (INF of EXE)
- DisplayLink software is only installed once a DisplayLink device is connected to a PC.
- Enables Windows to find the DisplayLink driver even when not connected to the Internet.
- Can be used alongside Windows Update to update drivers.
Cons of deploying the driver package to the windows driver store (INF of EXE)
- Requires the user to have Administrator privileges to complete the DisplayLink software installation
Deploying Using the MSI Files
It is not possible to install these MSI files just by double-clicking them to install. Please make sure that User Access Control (UAC) is disabled on the tested machine during installation, otherwise, the Audio and Ethernet drivers will silently fail to install due to an “Access Denied” error (even if a user is prompted for elevation).
This guide details the install of x64 bit Windows 10 Redstone onward, these steps will also work for 32-bit and other supported Windows OS's.
About The DisplayLink MSI Files
From V8.0 a single MSI file can be deployed. The version of the MSI file differs depending on the Windows OS version, as the graphics architecture changed in Windows 10 Anniversary update 2016.
Please note that the MSI used is OS dependant:
- DisplayLink_Win7-8.1.msi must be deployed to systems running Windows 7 to Windows 8.1
- msi must be deployed to systems running Windows 10 Redstone onwards (OS build 10.0.14393)
To ensure that only the correct MSI is installed on the correct architecture and operating system version, it’s necessary to utilize Group Policy’s WMI Filtering to target the correct OS architecture and version.
9.0 or Later
The corporate install zip file contains the following files from v9.0:
Win32
- DisplayLink_Win10RS.msi
- DisplayLink_Win7-8.1.msi
Win64
- DisplayLink_Win10RS.msi
- DisplayLink_Win7-8.1msi
DisplayLink_Win7-8.1.msi must be deployed to systems running Windows 7 to Windows 8.1
DisplayLink_Win10RS.msi must be deployed to systems running Windows 10 Redstone onwards (OS build 10.0.14393)
Please note: Windows 10 Threshold is no longer supported in driver version 9.0 onwards.
8.4 Until 8.6
The corporate install zip file contains the following files from v8.4:
Win32
- DisplayLink_Win10RS.msi
- DisplayLink_Win7-10TH2.msi
Win64
- DisplayLink_Win10RS.msi
- DisplayLink_Win7-10TH2.msi
DisplayLink_Win7-10TH2.msi must be deployed to systems running Windows 7 to Windows 10 Threshold 2 (OS build 10.0.10586)
DisplayLink_Win10RS.msi must be deployed to systems running Windows 10 Redstone onwards (OS build 10.0.14393)
8.0 Until 8.3
The corporate install zip file contains the following files from v8.0:
Win32
- DisplayLink_Win10RS1.msi
- DisplayLink_Win7-10TH2.msi
Win64
- DisplayLink_Win10RS1.msi
- DisplayLink_Win7-10TH2.msi
DisplayLink_Win7-10TH2.msi must be deployed to systems running Windows 7 to Windows 10 Threshold 2 (OS build 10.0.10586)
DisplayLink_Win10RS1.msi must be deployed to systems running Windows 10 Redstone onwards (OS build 10.0.14393)
Setting Up the GPO and File Shares
As this guide assumes knowledge of Group Policy, this section will be brief.
At the time of writing, the DisplayLink MSI’s are available in 32-bit and 64-bit. If you have both 32-bit and 64-bit Operating Systems in your organization, you will need to create two GPO’s; one for 32-bit and one for 64-bit. For reference, the 32-bit installer will not install on a 64-bit OS.
Targeting Only 64-Bit RS Onward Operating Systems (Using DisplayLink_WIN10RS.MSI)
Setting up the WMI Filter
- Open the Group Policy Management Console (GPMC)
- Locate WMI Filters
- Right-click on WMI Filters and choose “New”
- Give the WMI Filter an appropriate name and description. For example, “Windows 10”
- Click Add, to add a new query
- Add the following Query: select * from Win32_OperatingSystem WHERE (Version like "10.0.%") AND (BuildNumber >= "14393") AND (ProductType="1") AND (OSArchitecture = "64-bit")
- Click OK, then Save
Targeting Only 64-Bit Windows 7-10 TH Operating Systems (Using DisplayLink_WIN7-8.1.MSI)
Setting up the WMI filter
- Open the Group Policy Management Console (GPMC)
- Locate WMI Filters
- Right-click on WMI Filters and choose “New…”
- Give the WMI Filter an appropriate name and description. For example, “Windows 7”
- Click Add, to add a new query
- Add the following Query: select * from Win32_OperatingSystem WHERE (Version <"10.0.14393" or Version like "6.%") AND (ProductType="1") AND (OSArchitecture = "64-bit")
- Click OK, then Save
Setting Up The File Shares
- Download the DisplayLink Corporate install files.
- Create or use an existing file share for deploying software and drivers. The share must be accessible by the System user, in order for GPSI to install the software on the target PCs
- Extract the .zip that was downloaded into a DisplayLink MSI directory on your network file share. Your extracted files should look like this:

Creating The GPO
- Create a new Group Policy Object (GPO) in the Group Policy Management Console (GPMC) In this guide, we’ll be calling it DisplayLink Device Driver Deployment RS - 64-bit. You may wish to call it something else, particularly if you’re only interested in deploying the DisplayLink driver, and not extra drivers, such as Ethernet.
- Put the 64-bit DisplayLink_Win10RS.msi onto a network file share.
- Edit the GPO you just created, and go to Computer Configuration > Policies > Software Settings > Software Installation.

- Right Click > New > Package.
- Add and Assign DisplayLink_Win10RS.msi

Setting Up SCCM
This guide will assume admin knowledge of System Center Configuration Manager.
This section will only explain how to deploy the DisplayLink Software using SCCM. A requirement for this is a working Active Directory and SCCM environment with the Configuration Manager Client installed or being pushed, to the target machines.
Setting Up the File Share
- Download the DisplayLink Corporate install files.
- Create or use an existing file share for deploying software and drivers. The share must have at least read permission rights for the end-users, in order for SCCM to install the software on the target PCs.
- Extract the .zip that was downloaded into a DisplayLink MSI directory on your network file share. Your extracted files should look like this:


Creating The Installation Packages
- In Software Library \ Overview \ Application Management \ Applications, create a new application:

- Select “Automatically detect…” and “Type” as “Windows Installer (*.msi file)”. Browse to the network share used and select the “DisplayLink_xxxxx.msi” file.
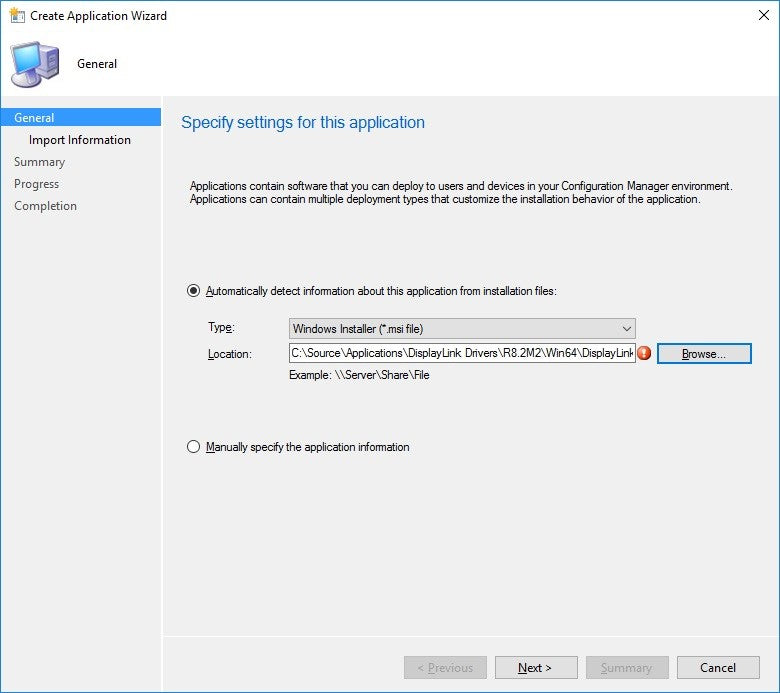
- If everything is correct, the following screen should appear:

- Give the application a name, in this case, the 64-bit version is being created. The name given here will appear in the list of applications in SCCM.

- When the creation of the application is complete, the following screen appears.


Setting The Device Collections
- In Assets and Compliance \ Device Collections, create new device collections suitable for your corporate OS deployment.
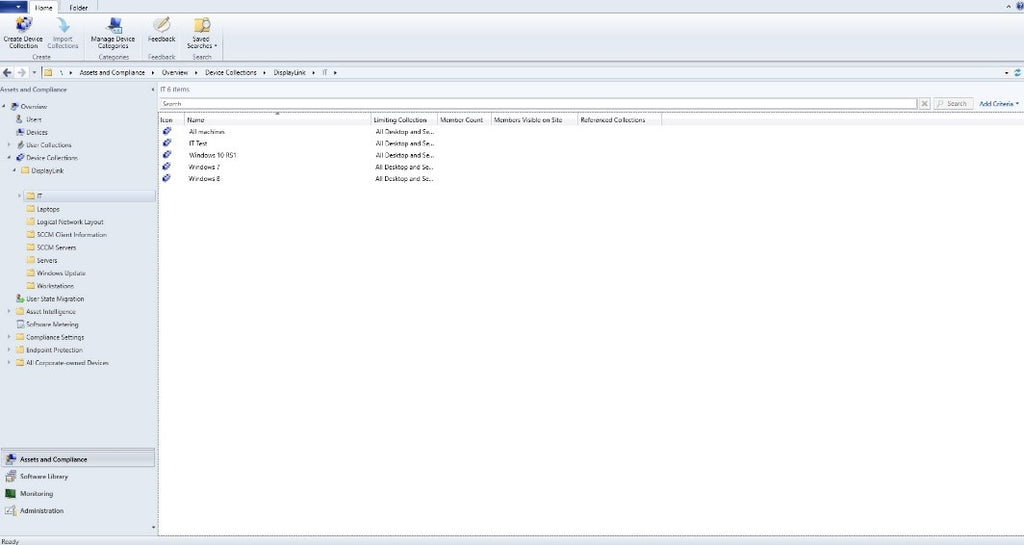
- In this example, we are using Windows 10 RS1 (OS build 14393): Create your device collection. Right-click and select Properties.

-
Add the query statement. Edit the query statement to look as below.


This page and apply to device collection.
Deploying The Application
- Navigate back to the application that was created earlier.
- Right-click on this application and select deploy.

- Select the device collection that the application is going to be deployed to.

-
Distribute this to your distribution points.


- Select either an available deployed or a required deployment.

-
You should now see this page displayed.


Testing
If you are testing without using a GPO, start the installation from command line with administrative privileges. The following commands can be used to install the packages using msiexec on the command line:
V9.0 Or Later
Windows 7 - Windows 8.1
msiexec /i %SETUP%\DisplayLink_Win7-8.1.msi /norestart /quiet
Windows 10 Redstone (Build 10.0.14393 and later)
msiexec /i %SETUP%\DisplayLink_Win10RS.msi /norestart /quiet
V8.4 to 8.6
Windows 7 - Windows 10 Threshold (Build 10.0.10586)
msiexec /i %SETUP%\DisplayLink_Win7-10TH2.msi /norestart /quiet
Windows 10 Redstone (Build 10.0.14393 and later)
msiexec /i %SETUP%\DisplayLink_Win10RS.msi /norestart /quiet
V8.0 To V8.3
Windows 7 - Windows 10 Threshold (Build 10.0.10586)
msiexec /i %SETUP%\DisplayLink_Win7-10TH2.msi /norestart /quiet
Windows 10 Redstone (Build 10.0.14393 and later)
msiexec /i %SETUP%\DisplayLink_Win10RS.msi /norestart /quiet
Testing GPO
It is best to test the GPO works before rolling it out company-wide. See the below steps required to test the GPO.
- Make a Test OU and put a few Test or Lab PCs in the OU. Call it something like “DPinst Test Computers”
- Apply the DPinst GPO to the Test Computer OU
- If your AD DC infrastructure is large, you may need to wait a while for the new GPO to propagate around.
- On the test computers, add a domain user as a Limited Account on the Test PCs
- Run: gpupdate on the Test PCs
- Reboot the Test PCs
- Log in as the limited user and plug in the DisplayLink device. If the Drivers install successfully, everything went OK. If the drivers didn’t install, wait a while and reboot again. It may be that Group Policy wasn’t refreshed properly on the Test PC, or the GPO hasn’t propagated fully yet. It can sometimes take two or three reboots to pick up the new Group Policy settings.
- Once everything works as expected, it should then be safe to deploy the solution onto the corporate network.
Testing SCCM
To test that the DisplayLink Driver has installed properly, open Software Center and run the application. If successful you should see the following window.
Rolling Out The Driver
To roll out the driver, simply link the GPO to which Computer OU you want to deploy the driver to.
After Installation
In order for the DisplayLink-enabled hardware to function properly, a subsequent reboot may be required after GPSI has installed the DisplayLink software on the end-users machine. This is normal, as installing a graphics driver under Windows usually requires a reboot, post-installation.
Deploying Using The INF Files
Deploying the driver package to the Windows driver store
The INF files can be used to add the DisplayLink driver into a Windows system image and for the driver to be installed when the DisplayLink device is connected.
To deploy the driver package, it needs to be added to the Windows driver store. This can be done using the Windows command pnputil. More information on pnputil can be found online.
To add the DisplayLink driver to the Windows driver store:
- Download the INF files.
- Extract the contents of the driver package
- Open a Command Prompt window (Run as administrator).
- Change directory to the extracted driver package files and execute the command:
This should show that the Driver package has been added successfully. Alternatively, the DisplayLink software can be added to the Windows driver store by running the DisplayLink setup executable with the command line switch -stageDrivers eg: setup.exe-stageDrivers
Deploying INF Drivers To Install.WIM Windows 10 Image With DISM
The following information describes how to inject DisplayLink INF Driver files into an Install.wim for DisplayLink driver slipstreaming into a deployment image.
This guide assumes that the following has been done:
- Extract Windows 10 ISO to Folder
- Convert Install.esd in [Extracted ISO Folder]\Windows\sources t Install.wim
- Replace Install.esd in [Extracted ISO Folder]\Windows\sourceswith Install.wim
- Open an elevated CMD prompt
Then enter the following commands substituting your folder paths where applicable.
Mount Install.WIM
dism.exe /Mount-WIM /WimFile:"[Location of Install.wim]" /index:1 /MountDir:"[Location of Mount Directory]"
Inject INF Drivers
In this example we are deploying to Windows 10 x64 so we will use the INF drivers in the following location
"DisplayLink USB Driver Package for Windows Preinstall (.INF) 9.X MX.zip\WinRS\x64"
dism.exe /image:"[Location of Mount Directory]" /Add-Driver /driver:" [Location of INF Driver Files]" /recurse
Unmount Install.WIM
dism.exe /Unmount-wim /mountdir:"[Location of Mount Directory]" /commit
Now you are able to package up the files in the Extracted ISO Folder and deploy using your preferred deployment method, ISO or via another deployment tool.
Note: Please ensure that DISM is updated to a version that matches or exceeds the OS you are deploying, or drivers may not install correctly.